Labels

BASS (50) COMPRESSION (32) DRUMS (45) EFFECTS (49) EQUALIZATION (30) GUITAR (112) HOME RECORDING (95) IMPULSES (21) INTERVIEWS (19) KARAOKE (1) LIVE (10) MASTERING (61) MIDI (21) MIXING (179) REVIEWS (156) SAMPLES (69) SONGWRITING (19) SYNTH (3) VOCALS (31)

Saturday, July 26, 2014

HOW TUBES AFFECT SOUND.


Hello and welcome to this week's article! Today we're starting from where we left in our How To Choose Guitar Amp Tubes article, and will take a look to how tubes affects the sound of our instruments.
Tubes have been used for audio equipment in the last century almost anywhere, first by necessity, then to give the sound an extra coloring, and still today there are some tube equipment made to be as clean as possible and some other one in which tubes plays a strong role in modifying the output.


Why does people often prefer a tube driven amplifier or other piece of gear instead of a non-tube one?
Because tubes usually adds something to the tone that still today hasn't been recreated otherwise with the same identical results: a bit of compression, a bit of saturation, and a harmonic enhancement that makes the final sound a bit smoother and more ear-pleasant.

When mixing, the main uses for tube gear are:

- to smooth over harsh signals, such as vocals, guitars, cymbals and other instruments that stands out too much (in this case producers tends to use tube compressors and preamps).

- to add some harmonic enhancement to an instrument that sounds a bit too dull, without the need to over-equalizing, which will unavoidably modify the nature of our sound, for example a snare drum, or a kick, or toms, or even a bass guitar (the tools for this job are the tube saturation-harmonic enhancers and tube equalizers).

A last advice is about how to use tube gear.
Tubes needs some time to warm up, usually for 15 minutes, and in this time they can have irregular output peaks, before they get stable to the right level of warmth.
You will surely notice (and this is particularly clear when using a tube guitar amplifier) how different the sound is with the tubes fully warmed up, compared to how thin it sounded immediately after the switch on.
So our last advice is to warm the tubes up before starting playing/recording/mixing, and when you don't need them, turn the device off, since they tend to wear down with the use!|

The video on the top of this page is from my band, I have used a tube preamplifier in order to smooth out a bit of the harshness of the vocals and the cymbals.


Become fan of this blog on Facebook! Share it and contact us to collaborate!!

Friday, July 18, 2014

HOW TO USE MULTIBAND COMPRESSION WHEN MASTERING! (a guide for dummies)


Hello and welcome to this week's article!
This time we're going to expand our article about Mixing with Multiband Compression talking about the main purpose of this tool: Mastering.
When the track is ready for the mastering phase, we all know that it should pass though the last processing steps before reaching a volume comparable to the commercial tracks, adding if needed the last "icings on the cake", but it is actually very important to take care of the balancing and the other aesthetic aspects of the song in the mixing phase, resolving the issues before arriving to this last step:
the track should already sound at its best, leaving to the mastering phase only the final push.

Looking things under this point of view it appears crucial to work in the most transparent and essential way, because the risk of compromising the complex castle of cards that is a perfectly balanced mix is very high, and this is the reason why some mastering engineer prefers putting in the mastering chain a Multiband Compressor instead of a Broadband One: to assign a particular setting to each part of the spectrum, instead of using one processor that affects with the same intensity the whole mix.

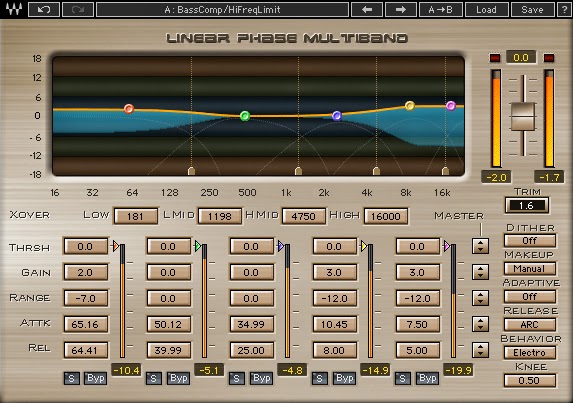
Let's make an example of how to use a multiband compressor on our master track, and for this example we're going to use the Waves Linear Phase MB, as in the picture above, but basically the same mechanics applies to any other multiband comp.

Let's open the Waves Linear Mb and play the whole song, adjusting the input looking at the top right corner meter in the UI, so that it doesn't clip (we can also click on the "Trim" button to lower the gain right below the clip level).
When the whole song will be played, we'll check out the number on the right of the "Solo" and "Bypass" buttons on each band. These numbers are the peaks on each band, so we will need to dial these same numbers in the "threshold" section of that same band (for example -10, -5,5, -12 and so on).
Once we have done this task, we will notice that the sound should be more "stable", since only the infrequent highest peaks that reach that level will be tamed, and only in their most relevant frequency area. This operation will give us some extra headroom to raise the overall level, and ultimately, will let us obtain a more powerful and transparent master, if we don't love the slighly more invasive feel of a broadband compressor.

Now it's time for the final adjustments: we can add or lower some db of gain on the single bands if we need (this will combine the compressor function of this tool with the tasks of an equalizer), and we can fiddle around with the Attack and Release functions, remembering that usually you have set them properly if you see the compressor kicking in and out in time with the song.
It is also possible to turn on or off the "Makeup" function, which raises the gain according to the gain reduction produced, and to set the "Adaptive" level, which helps avoiding one frequency area to mask another one through the song.


Become fan of this blog on Facebook! Share it and contact us to collaborate!!
Saturday, July 12, 2014

RECORDING IN MULTITRACK, CHANNEL ROUTING ETC (a guide for dummies)


Hello and welcome to this week's article!
Today we're going to talk about Multitrack, recording, and this article links to our Drum Recording article, which I invite you to check out because it's quite complete.

The topic of the day is "how do we get the sound of multiple microphones into our Digital audio workstation, in an ordinate way?".
First off we're going to need a multichannel audio interface or a mixer that brings the individual tracks into separeted tracks to the Daw; usually audio interfaces features 2 to 8 ins, but they can be expanded via ADAT devices, for example we could use a Behringer Ada 8000, which is a  8 channel interface that does not connect directly into the computer via usb, but it's used to expand the inputs of another interface, so that for example we could obtain the 8 channels of our interface + the 8 of the adat, for a total of 16 preamplified mic inputs.


Now it's important to mark all jacks with a number, in order to find them more easily once we are creating our project: Jack 1 into channel 1, Jack 2 into channel 2 and so on, and if we have configurated the interface drivers properly, we should find the right channel already routed to the corresponding track of the Daw.
Once everything is set it's important to rename each track in the Daw project to make order: every channel must have the name of the instrument that is tracking (eg. Snare, Kick, Tom...) then we can proceed to the project preparation phase


One last thought: avoid to have the jacks tangled together as in the picture above, the studio must be as clean and ordered as possible to be efficient, and if we have the mixing room separated from the tracking room (something that not happens often when home recording, but that usually small studios have), all jacks should be brought from one room to the other though a channel box, which is a box with a serie of microphone inputs that takes them and unites them all into one single cord that ends with all separated connectors (for example, 24 inputs and 24 outputs), and it is used to tidy up and help bringing the jacks from one room to another, instead of sending for example 24 separated cannon - cannon jacks.


Saturday, July 5, 2014

REVIEW: DRAGOON GUITAR CAB 2X12 with CELESTION V30 SPEAKERS


Hello everyone and welcome to this week's article!
Today we're going to talk about another Italian excellence, exported worldwide: the Dragoon guitar Cabinets.
Those guitar cabinets are made by a manufacturer located in Florence, Italy, and have the particularity of being the lightest in the market: 41lbs (approx. 18 kg), it's the lowest weight available for a 2x12 cabinet.
The cabinet features 2 removable back panels, to make it closed back, half open back and open back, and has both mono and stereo inputs, 4, 8 and 16 ohm.

The Cabinet comes with a wide range of speakers to choose from:

250c8g - celestion alnico gold
260c8v - celestion vintage 30
230c8h - celestion g12h
225c8m - celestion g12m greenback
260c8cl - celestion classic lead 80
260c8cv - celestion century vintage
2100c8k - celestion g12k-100
230c8h - celestion g12h heritage
265c865 - celestion g12-65 heritage

Dragoon cabinets are available in 1x12 and 2x12 version, for guitar and bass, and are designed by a famous Florence luthier, called Giniski, which is also an amp tech, and his cabinets are endorsed by many musicians worldwide, for example Giacomo Castellano (session man for Vasco Rossi, among the others) and Nicola Oliva (session man for Laura Pausini).


Become fan of this blog on Facebook! Share it and contact us to collaborate!!