Labels

BASS (50) COMPRESSION (32) DRUMS (45) EFFECTS (49) EQUALIZATION (30) GUITAR (112) HOME RECORDING (95) IMPULSES (21) INTERVIEWS (19) KARAOKE (1) LIVE (10) MASTERING (61) MIDI (21) MIXING (179) REVIEWS (156) SAMPLES (69) SONGWRITING (19) SYNTH (3) VOCALS (31)

Saturday, April 1, 2023

NAM: Neural Amp Modeler, what is it and how does it work.


Hello everyone and welcome to this week's article!

This time we're going to talk about a free amp profiler that's being developed by Steven Adkinson, and it's a software that is currently under development but it can already work decently and has seen the birth of a huge internet community (here).

NAM is an amp simulator which features the most common controls and an IR loader, but that bases its uniqueness on the fact that you can load into it models which are snapshots of real rigs (in a way similar to what IK Multimedia Tonex and Kemper profiling amp do).

Which are the differences between NAM and the other profilers? The difference is the fact that this one is in beta, is has a less polished interface and still needs some refinment, but the fact that it's free and that has a sound quality that has nothing to envy to the other profilers makes up for everything!

What's the different from an amp simulator and an amp profiler? An amp simulator emulates the way a circuit reacts, while a profiler takes a test tone and makes it pass through a real rig (which can be an amp, or a pedal, or even hardware mixing outboard) and tries to recreate how the hardware reacts adapting these cues to its structure, with results usually more true-to-life than the regular simulators. 
I am not sure if I have explained it with the correct words, but the result is that profilers are in the last few months disrupting the amp sim scene which has been dominating the last 20 years, and in the case for example of NAM there is a large community online which is sharing its captures (hundreds!) and you can download them freely and try them out: some are good, some are bad, but it's really amazing to see all this ferment around this tool, and really all you need to do is to install the Vst (which can be downloaded here), load it in your DAW, add a cabinet simulator, load the model you want from those you downloaded and treat it like any other amp sim.

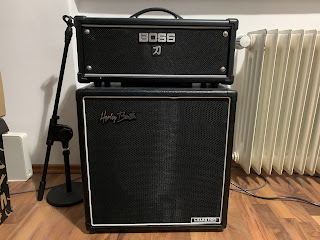
Now let's see toghether if you have a real amp, for example a tube head, and you want to create a profile of it, what to do (you can see more also on this video):  

- first off setup your computer for reamping (you'll need to connect your audio interface to the input of your amp via a reamp box, click here for a dedicated guide).

- download the training wav file here, create a new project in your DAW at 24bit 48khz and load this file into a mono track.

- reamp the training file through your rig and record the resulting output file into a new mono track, which will basically be the training file which has passed through your amp and has acquired all the characteristics, for example of the overdrive channel.

- Normalize and export the reamped file (exactly of the same lenght of the training file) in mono at 24bit and 48khz and rename it "output.wav".

- go to this page and upload the output.wav file and the training wav file in the root folder on the left as per the image in the point of the arrow 1 (click on the pic to enlarge it):


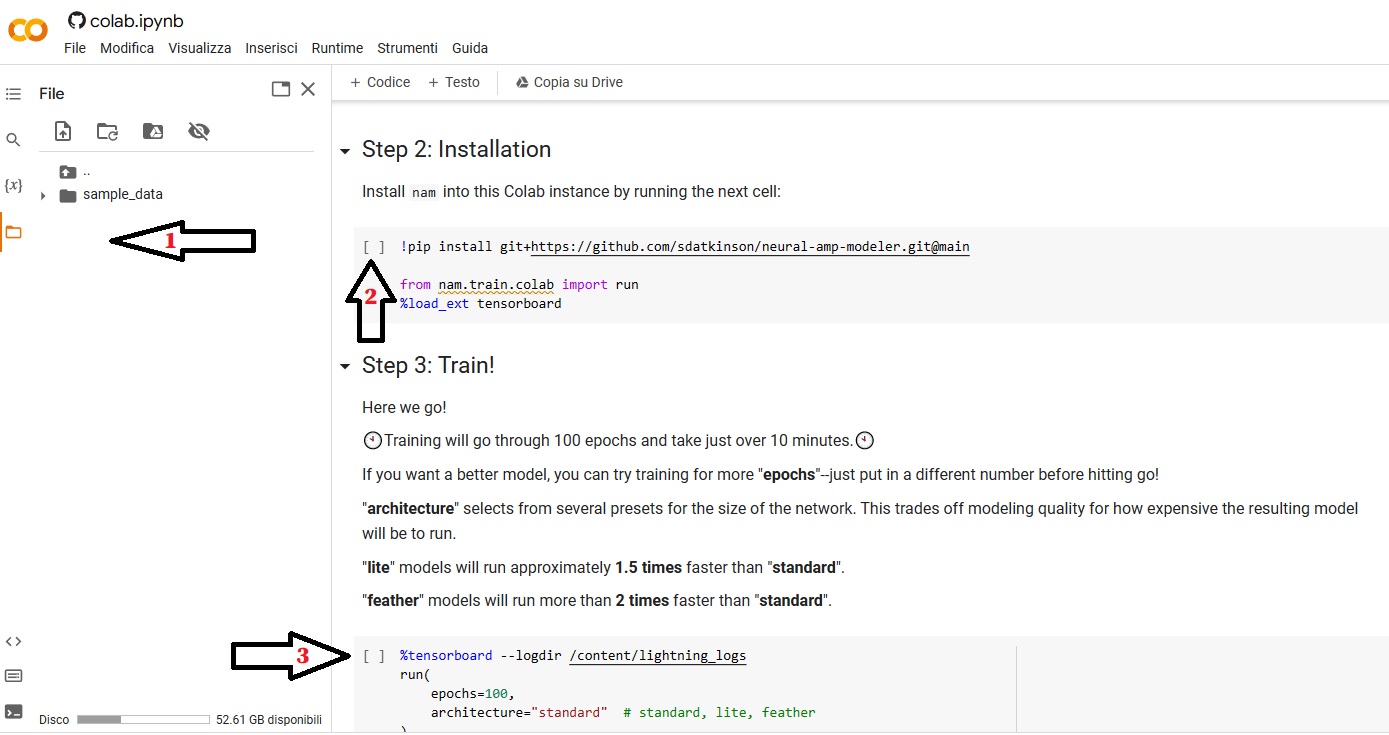
- once the files are uploaded click on the space between the brackets pointed by the arrow 2, it will start loading and this will take around 10 seconds.

- once the loading part is completed click on the space between the brackets pointed by the arrow 3, and it will start loading again. This process can take some time, around 10 minutes, but at the end if everything went according to the plan you will receive an output file into a folder indicated at the end of the process. You can download this output file (with the extension .NAM) and load it directly into the plugin, and if everything went well you will have a faithful replica of your amp!

What do you think of this plugin? Do you think amp profilers will completely replace the amp sim world?

Let us know in the comments below!


Become fan of this blog on Facebook! Share it and contact us to collaborate!!

Saturday, February 18, 2023

How to mic a drumkit with snare top and bottom (part 2/2)


Moving to the cymbals, let's start from the hi-hat: I have used a dynamic mike (a Shure SM57), but in other occasions I've used also a microcondenser: the microcondenser sounds even better, but it has more bleed issues, so it depends on the genre, on how strong the drummer hits it and so on. 
For the positioning, I have chosen to place it on the opposite side of the snare and in vertical, to try to reduce the bleed. 


These last 3 pics are all for the last element: the overhead microphones. I have used those 2 microcondenser mikes to pick up the cymbals in the 2 sides of the drumkit, pointing left and right according to the position of the drummer, and directing them towards the center of the cymbal group, with the right microphone that picks up also the ride.

The final result was quite clean, and it offered me some good material to work on, especially the snare.

Let me know what do you think about this microphoning technique in the comments below! 

Thanks to my friend Zoltan for the pics!


CLICK HERE FOR PART 1/2


Become fan of this blog on Facebook! Share it and contact us to collaborate!!

Saturday, February 11, 2023

How to mic a drumkit with snare top and bottom (part 1/2)


Hello everyone and welcome to this week's article!

Today we're going to see a method to record a drumkit slightly different from the version proposed in our main "How to mic a drumkit" article, and somehow this can be considered also a more advanced version of it: we're going to see how to microphone a drumkit with 8 mikes, but with 2 toms instead of 3 (including the floor tom) and using 2 microphones for the snare: one for the top and one for the bottom. In this article I will elaborate also a bit more regarding the mic positioning.


Let's start with the kick: this time I did not push the mic too deep, trying to get close to the beater: I've realized that the low end generated by the proximity effect is higher than the "click" of the beater I wanted to catch, so I backed the microphone leaving it half inside the hole and half out (yes, it sounds like a horrible pun, but there's nothing I can do about it :D): this way the lows are under control and the microphone picks up better also the top end, the result is a more balanced and usable tone.


Moving to the toms, this is something I've tried to apply the same principle to the toms and to the snare: to try to aim the mike towards a point close to the border of the shell, because pointing towards the center makes the tone too dark, but if you aim too much to the border you get too much ring, so you need to try until you find the right balance between the ring and a nice, full but bright tom sound (this applies also to the floor tom). Also, don't forget that since usually dynamic microphones are cardioids, it's good to point the back of the microphone towards the loudest cymbals, because the back of the microphone is the part that picks up less sound, so it will limit the bleed.


Finally, talking about the snare, as you can see from the pic, I've decided to use a Shure Beta58a for the top and a Shure SM57 for the bottom, trying to create a 90 degrees angle. 
Both microphones were pointing towards a similar spot, like the one for the toms: close to the border, but not to the point that it picks up too much ring note, if the ring was too strong, I was moving the snare top mike 1cm more towards the center, until eventually I've found the sweet spot.
In this case the snare top mike takes the body of the snare sound and some ring, while the snare bottom one is aimed to pick up the top end, the grainier, more explosive part of the tone. 
This way we have a lot of flexibility when creating our snare tone during the mixing phase.


CLICK HERE FOR PART 2/2


Become fan of this blog on Facebook! Share it and contact us to collaborate!!

Saturday, January 21, 2023

REAMPING: How to reamp a guitar track (part 2/2)

 CLICK HERE FOR PART 1/2

Following the instructions of the first part of the article, the setup should be ready: we should have a nice DI track, recorded at the right level, and all the routing in the DAW and in the sound interface software should be correctly set up: our guitar track is ready to be reamped!


4) Now we need to go from the audio interface output we have chosen for the DI track (in our example we have choosen the output n.3) into a REAMP BOX. What is a reamp box? It's a box that does exactly the opposite of a DI box: it takes a balanced signal (the one that comes out from the audio interface) and turns into an unbalanced one, meaning one at the right level to be fed into a guitar amp input (if you want you can also pass through pedals etc. before entering the amp, but remember that the signal comes out from the reamp box usually with more noise compared to if it would come straight from a guitar). Once the reamp box is plugged into the amp, we need to adjust the output level of the box in order to be the as loud as if it would be coming directly from a guitar.

5) Once the cables are plugged, it's time to press play on the DAW and let the song go: if we have done everything correctly, from the DAW monitors (or headphones) we should be able to hear the whole song, and from the amp we should be hearing only the correct guitar track. 
This is the moment in which we find the right tone in the amp, so let's take our time in finding the right gain, eq, effects etc.


6) The last step is obviously the microphonation one: once we have a tone we like, we can start having fun, trying out all the microphones we have until we find the best combination and positioning among them (click here for some ideas), and the only remaining thing to do is to press record and enjoy our reamped track!

I hope this was helpful!


CLICK HERE FOR PART 1/2


Become fan of this blog on Facebook! Share it and contact us to collaborate!!

Saturday, January 14, 2023

REAMPING: How to reamp a guitar track (part 1/2)

 Hello and welcome to this week's article!

Few years ago we have done an article about reamping (click here for the main article): now it's time to see in detail, step by step, how to reamp a guitar track.

The first thing to lear is how to route your channels to make sure that from the output channel of your audio interface only the guitar di signal comes out, while from your headphones or monitors you can keep listening to the whole project.

First off: you need to have in your project a DI guitar track, then, since usually all the tracks go to the stereo out, we need to steer this one away from there and make it go to a separate exit of our DAW and audio interface, an exit in which only our guitar track will be.

Today we're using the Presonus Studio One interface, but it should work more or less like this in every DAW: 

1) Go to song setup -> inputs and outputs and create a new mono output besides the standard stereo one (I've called it reamp, and the M there stands for Mono).


I have chosen "LINE 3", which means that when I assign the DI track to the output named "reamp" it will be listenable only by plugging the headphones to the output n.3 of my audio interface.

2) While all the tracks are assigned by default to the main out, meaning they will all end up into the stereo out buss (in the pic it's called "principale", because my interface is in Italian), I have changed the out for my DI track into "reamp", the new output we have created.


3) now we need to assign this "reamp" out to the physical out n.3 in my audio interface (you can assign it obviously to any out you want, just make sure the DAW and the output you're using in your interface are matching), and in order to do this we need to open the control panel of our audio interface, in my case it's the Saffire Mix Control from Focusrite.


In this case I assign "DAW 3" (which means the output to which we have routed our DI track in the DAW, which as you can see in the first picture is the out called "line 3") and we assign it in the "line output 3" slot (red arrow in the bottom of the pic), and we also assign it to a channel in the virtual mixer (red arrow in the top).

Now if everything went according to the plan, if we plug the headphones to the main headphone out of the audio interface we should be able to hear all the tracks going into the stereo buss EXCEPT the guitar DI one, while if we plug them into the out n.3 we should be able to hear only our DI track.

Once this complex preparation phase is done, it's TIME TO REAMP!


CLICK HERE FOR PART 2/2


Become fan of this blog on Facebook! Share it and contact us to collaborate!!
 

Saturday, January 7, 2023

Review: Harley Benton G112 Vintage


Hello everyone and welcome to this week's article!

I was looking for a small 1x12 cabinet for my travel setup (which consists in a Boss Katana 100 head), and my idea was to look for one with a Celestion Vintage 30 speaker, which is a standard for rock and metal.
The V30 speaker is particularly good for hard music because it can handle high wattages (60w nominal power rating) and because it provides a strong low-mid thump and mid range, which is particularly suited for lower tunings and palm muting.

While browsing around for cabinets, I've stumbled upon the Harley Benton G112 Vintage, a cabinet made in China and imported from the German Shop/Distributor Thomann, and given the surprisingly low price (lower than the price of the speaker itself if bought separately!) I have decided to give it a try.

The cabinet is black, of the size of the average 1x12 combo amp, not particularly light nor heavy, and with a half-open back to retain a bit more low end, which is useful since it's quite small.
On the back there is only one input, 8 ohm mono, which makes it not very flexible but it's the most common choice and it's supported by basically every amp, and in general this cabinet has a pleasant look and feels solid in build quality. 

How does it sound?
It sounds quite well! The speaker has the unmistakable V30 tone, and the Katana head roars through it with no problems, plus this setup makes also a very good companion for home recording, because the Katana head can be used also at lower wattages, and the cabinet lends itself nicely for any type of microphoning, also at low volumes.

Do I suggest it? Hell yeah! At this price it has basically no competitors, and I don't see any reason not to buy one.

Thumbs up! 


Specs taken from the website:


- Equipment: 1x12" Celestion Vintage 30 speaker

- Power rating: 60 W

- Impedance: 8 Ohm

- 18 mm Poplar plywood housing

- Half-open rear wall

- Rearloaded

- Trim strip

- Carrying handle

- Dimensions (W x H x D): 460 x 470 x 299 mm

Saturday, December 31, 2022

Different types of microphones for guitar and common combinations among them


Hello everyone and welcome to this week's article!

This time we're going to check out the various types of microphones we can use to mic a guitar amp, and this article can be considered as a supplement to the basic one "how to mic a guitar amp".

Assuming that you have read our basic article and you are familiar with how the horizontal distance from the dustcap of the speaker can make the tone brighter or darker, here are 3 common mic combinations that you can try, it doesn't matter the exact microphone model you have (for example whether the condenser one is small or large diaphragm: the sound will be different, but the basic concept stays the same). 

First off: why to combine two microphones? Because every type of microphone has a different eq curve, curve that changes also according to the position from the speaker, so it happens often that one single microphone is not capable of capturing a tone that is full and has for example a detailed high end and a full low-mid area: most of the times trying to make everything with one mike leads to a compromise that can be good, but that rarely can be perfect in every aspect.
Using two microphones therefore allows us to use one for the low-mid area and one for the high end, and we can also use the faders in the DAW to choose the right balance.

Second note: every microphone type has different requirements, for example a ribbon microphone is fragile if left in front of high sound pressure, the ribbon can bend or break due to the air movement, so you need to use a volume that is not too high if you are using it for close miking, or a condenser microphone needs phantom power, but you need to make sure that the phantom is deactivated in the channel of the ribbon one, otherwise the ribbon microphone will break.
It's a good idea in the studio, when using condenser and/or ribbon microphones not to crank the amp volume too much, it's sufficient to arrive to see a little bit of movement in the speaker.


Dynamic + Condenser = this is a popular choice both in modern music and in the '70s one: the dynamic microphone should be placed straight or angled, mid way between the dustcap and the edge of the speaker and its role is to pick up the mids and low-end: the more it's pointed towards the edge of the speaker, the darker it will get. The distance should be a couple of centimeters from the grill cloth. 
The Condenser microphone instead will take high end, so it should be pointing towards the center of the dustcap, and its distance should be regulated according to the mic sensitivity: if it's very sensitive it's better to keep it 20-30cm from the speaker, maybe even 50, while if it sounds too thin or you hear that there is too much room in the track (and if the amp volume is not too high), it can be put as close as 5-10cm. If you feel like the tone capture by the condenser mic is clipping, lower the gain in the audio interface and/or back it off a few cm. 

Dynamic + Ribbon = this tone was used a lot in the '80s and produces a warm tone with a nasal mid-range (for example imagine a Guns'n Roses type of mid-range), the most classic technique is to put the ribbon microphone 2 to 10cm from the grill cloth pointing towards the dust cap, and the dynamic one right on the side, so that it points towards the edge of the dustcap, at around 2 cm from the grill cloth. This will create 2 complementary tones, with the ribbon microphone that is more dark and nasal to provide the body (but also part of the high end) and the dynamic one to bring more detail in the high end. 

Condenser + Ribbon = this is a less used technique but it's pretty interesting: the ribbon microphone placed as in the Dynamic + Ribbon technique, but pointing a bit more towards the edge of the dustcap (so the sound is even meatier), and the condenser one placed like described in the Dynamic + Condenser technique, to take all the detail in the top end. This technique is a bit more complicated but if handled well it can create very good results.


Finally, it's important when doing mic placement to check the phase coherence in order to avoid cancellations! Click here for a dedicated article.


And you? Do you know other good microphoning techniques? Let us know in the comments!


Become fan of this blog on Facebook! Share it and contact us to collaborate!!